Blog
Learning Materials
Build Your Perfect Hair Oil Routine for Growth
Updated: April 18, 2026
TL;DR:
- Hair oil routines improve scalp health by increasing blood flow and nourishing follicles.
- Choosing personalized oils and applying them correctly enhances hair growth results.
- Tracking progress and adjusting routines based on individual responses yields better long-term growth.
Watching your hair thin out or stall in growth is genuinely discouraging. You try product after product, and nothing seems to move the needle. The good news is that a targeted, personalized hair oil routine can create the scalp conditions your follicles need to thrive. This guide walks you through exactly why oils work, which ones suit your hair type, how to apply them correctly, and how to track real results. No guesswork, no generic advice.
Table of Contents
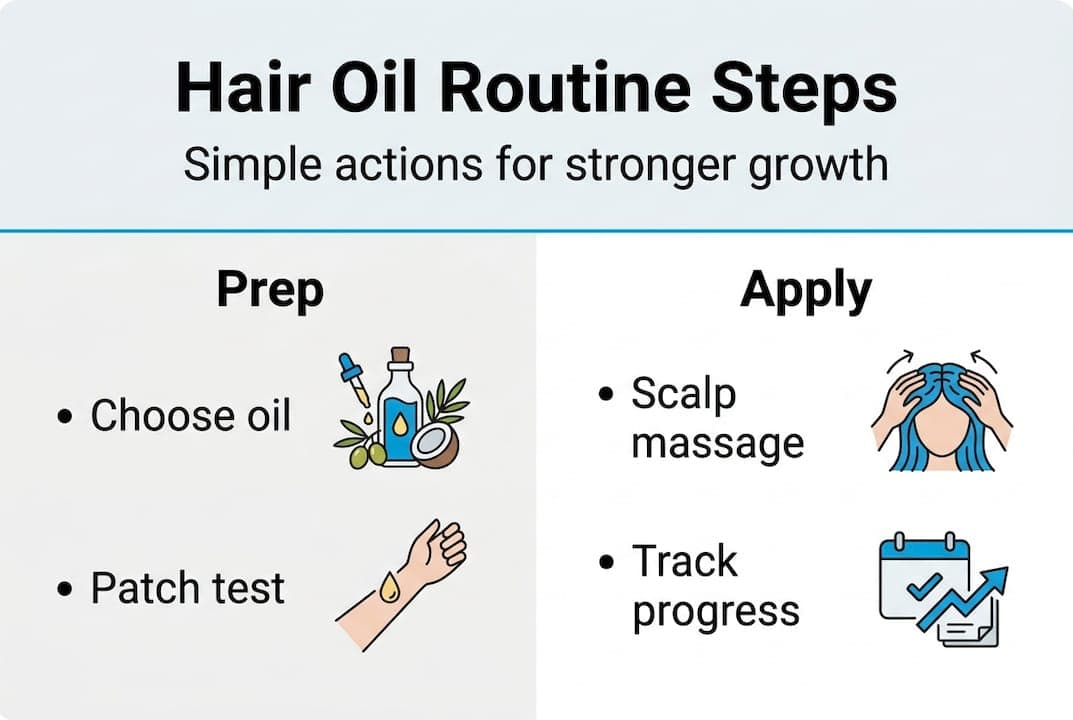
- Understand why hair oil routines work for growth
- What you need: Choosing your hair oil and tools
- How to apply hair oil: Your personalized step-by-step routine
- Common mistakes and troubleshooting your routine
- Tracking progress and what results to expect
- Our take: Why personalization is the future of hair oil routines
- Get your AI-powered routine for faster growth
- Frequently asked questions
Key Takeaways
| Point | Details |
|---|---|
| Consistency matters | Oiling your hair regularly yields better and longer-lasting results for growth. |
| Personalization is crucial | Selecting the right oil and routine based on your hair type ensures the best outcome. |
| Track your progress | Monitoring changes helps fine-tune your routine and boosts motivation. |
| Avoid common errors | Steer clear of over-oiling and poor rinsing to keep your scalp healthy. |
Understand why hair oil routines work for growth
Your scalp is living tissue, and it responds to the right kind of care. When you massage oil into your scalp, you increase blood flow to the hair follicles, delivering oxygen and nutrients that support the growth cycle. Think of it like watering a plant at the roots rather than spraying the leaves. The effect is direct and meaningful.
Natural oils like coconut, castor, and rosemary have been shown to improve scalp circulation and strengthen hair follicles. Each oil works differently. Coconut oil penetrates the hair shaft to reduce protein loss. Rosemary oil has been compared to minoxidil in small studies for stimulating follicle activity. Castor oil's thick consistency coats strands and helps retain moisture, which reduces breakage.
The Hair Cosmetics: An Overview research confirms that oils form a protective film around the hair shaft, reducing friction and mechanical damage over time. That matters because breakage is often mistaken for slow growth.
Here's a quick look at how the top oils target specific problems:
| Oil | Primary benefit | Best for |
|---|---|---|
| Coconut | Protein retention | Dry, brittle hair |
| Rosemary | Follicle stimulation | Thinning, slow growth |
| Castor | Moisture retention | Coarse, low-porosity hair |
| Argan | Frizz control and shine | Damaged, color-treated hair |
| Jojoba | Scalp balance | Oily scalp, dandruff-prone |
"Oil routines support the conditions for hair growth. They don't rewrite your genetics, but they can absolutely change what your hair does with the genetics you have."
This is worth repeating: oil is not a magic fix for genetic hair loss. But it creates a healthier environment where your follicles can perform at their best. If you're curious about which oils have the strongest research behind them, the guide on top hair growth oils breaks this down in detail.
What you need: Choosing your hair oil and tools
Now that you know why hair oil routines work, let's prepare everything you need for success.
You don't need a cabinet full of products. A focused kit works better. Here's what to gather before you start:
- Hair oil suited to your scalp and hair type (see table below)
- Applicator bottle with a nozzle tip for precise scalp application
- Wide-tooth comb to distribute oil through the lengths
- Old towel or hair cap to protect your pillow during overnight treatments
- Gentle clarifying shampoo for thorough rinsing
- Timer to track your massage and leave-in time
Different hair types and concerns require specific oils for maximum effectiveness. Here's a comparison to help you narrow it down:
| Hair type or concern | Recommended oil | Why it works |
|---|---|---|
| Fine or thinning | Rosemary or argan | Lightweight, won't flatten strands |
| Dry and coarse | Castor or coconut | Deep moisture and protein support |
| Oily scalp | Jojoba | Mimics sebum, balances production |
| Color-treated | Argan or sweet almond | Protects without stripping color |
| Curly or coily | Castor or avocado | Seals moisture into tight curl patterns |
For frequency, a good starting point is once a week for most hair types. If your scalp is very dry or your hair is coarse, twice a week is fine. If you have a naturally oily scalp, stick to once every 7 to 10 days and focus the oil on your lengths rather than your roots.
For choosing the right hair oil, also check the top oil recommendations for curated picks by hair concern.
Pro Tip: Before committing to a new oil, do a patch test. Apply a small amount to your inner wrist and wait 24 hours. If there's no redness or itching, you're good to go. Over-oiling is one of the most common mistakes, so start with less than you think you need.

How to apply hair oil: Your personalized step-by-step routine
With your oil and tools ready, here's how to apply oil for maximum growth results.
Consistency in oil application of 1 to 2 times per week is key to seeing results. Set a recurring day on your calendar so it becomes automatic rather than optional.
Here's your step-by-step routine:
- Start with clean or lightly dirty hair. Applying oil to a freshly washed scalp works best. Avoid applying over heavy product buildup.
- Warm the oil. Place your oil bottle in a bowl of warm water for 2 to 3 minutes. Warm oil absorbs faster and feels better on the scalp.
- Section your hair. Divide into 4 sections so you can apply oil directly to the scalp without missing spots.
- Apply oil to the scalp. Use your nozzle applicator to dot oil along each parting. Use less than you think you need.
- Massage for 5 to 10 minutes. Use your fingertips (not nails) in small circular motions. This stimulates blood flow and aids absorption.
- Work oil through the lengths. Use any remaining oil on your palms and run it through the mid-lengths and ends.
- Leave in for at least 30 minutes. For deeper conditioning, leave overnight with a hair cap.
- Wash out thoroughly. Shampoo twice if needed to remove all residue. The benefits of hair oiling are maximized when the scalp is clean after treatment.
For high-porosity hair, warm oil treatments absorb quickly. For low-porosity hair, the heat step is especially important because the cuticle is tightly closed and needs help opening.
If you want to build a full effective oil hair routine or explore using oil for growth on natural hair specifically, those resources go deeper into customization.
Pro Tip: Use the pads of your fingers and apply gentle but firm pressure during your scalp massage. Avoid scratching or rubbing aggressively. The goal is stimulation, not irritation.
Common mistakes and troubleshooting your routine
Now that you know the steps, it's just as important to avoid common mistakes that sabotage healthy hair growth.
Over-oiling or poor rinsing can lead to scalp buildup and weaken hair. Here are the most frequent pitfalls and how to fix them:
- Applying to a dirty scalp. Oil on top of buildup traps debris and clogs follicles. Always start with a reasonably clean scalp.
- Using too much oil. More is not better. Excess oil sits on the surface and attracts dirt without penetrating the follicle.
- Skipping the rinse. Residual oil left on the scalp after washing can cause flaking that looks like dandruff but is actually buildup.
- Using the wrong oil for your scalp type. Heavy oils like castor on an already oily scalp will make things worse, not better.
- Expecting overnight results. Hair grows about half an inch per month on average. Patience is part of the process.
According to common mistakes in hair oiling, many people abandon routines too early because they expect fast results or experience minor irritation they don't know how to troubleshoot.
If your scalp gets itchy or flaky after oiling, reduce frequency first. If the issue continues, switch to a lighter oil like jojoba or grapeseed. For more detailed troubleshooting and homemade hair oil tips, there are solid DIY options worth exploring.
"Start slow and listen to your scalp's signals. It will tell you exactly what it needs if you pay attention."
Tracking progress and what results to expect
To measure your success and stay motivated, here's how to track your routine's progress.
Visible hair growth improvements often take about 2 to 3 months of consistent routine. Here's a realistic milestone breakdown:
| Timeframe | What to look for |
|---|---|
| 1 month | Less shedding during washing and combing |
| 3 months | New baby hairs at the hairline, improved scalp feel |
| 6 months | Noticeable length retention, stronger strands, fuller appearance |
Signs your routine is working:
- Reduced hair on your brush or in the shower drain
- Scalp feels less dry or itchy between washes
- Hair feels stronger and less prone to snapping
- You notice short new hairs at the temples or crown
- Overall hair appears fuller and more manageable
If you hit the 3-month mark with none of these signs, it's time to reassess. Try a different oil, adjust your frequency, or look at other factors like nutrition and stress. Tracking is what separates people who see results from those who give up too soon.
Keep a simple hair journal. Once a week, note how much hair you shed, how your scalp feels, and take a photo in the same lighting from the same angle. Over time, the photos tell a story that's hard to argue with. For guidance on best oils for faster results, reviewing your oil choice at the 3-month mark is a smart move.
Our take: Why personalization is the future of hair oil routines
Most hair advice treats everyone the same. Use rosemary oil. Massage for 5 minutes. Repeat twice a week. That's fine as a starting point, but it ignores the fact that your hair is not the same as anyone else's. Your hormones, your scalp's oil production, your hair's porosity, your stress levels, your diet, all of these shift the equation.
Generic routines plateau. They work until they don't, and then people assume the method failed when really the method just stopped fitting their current needs. Seasonal changes alone can shift what your scalp needs. Winter calls for heavier moisture. Summer may require lighter oils and more frequent cleansing.
The most effective approach is one that adapts. That means tracking your results, staying curious about what your scalp is telling you, and being willing to adjust. Tailored oil routines built on actual data about your hair's behavior will always outperform a routine copied from a blog post or a friend's recommendation. Real progress comes from treating your hair like the individual system it is.
Get your AI-powered routine for faster growth
Building a personalized routine by trial and error takes time. MyHair.ai shortens that process significantly.

The AI-powered hair analysis at MyHair.ai scans your scalp and hair to identify your specific patterns, concerns, and needs. Instead of guessing which oil fits your hair type, you get a data-driven recommendation tailored to your actual condition. You can start your hair analysis in minutes and receive a personalized oil routine built around your unique scalp profile. If you want to understand the research powering these recommendations, see the science behind personalized hair routines and how AI is changing what's possible for hair growth.
Frequently asked questions
How long before I see results from a hair oil routine?
Most people notice less shedding and new growth within 2 to 3 months of consistent oiling. Results vary based on hair type and the underlying cause of hair loss.
How often should I oil my hair for growth?
1 to 2 times per week is optimal for most people to avoid buildup while still encouraging growth. Oily scalp types should stay closer to once per week.
Which oil is best for thinning hair?
Light oils like rosemary, argan, or sweet almond work well for thinning hair because they stimulate the scalp without weighing strands down. Specific oils for concerns depend on your full hair profile.
Can I make my own hair oil blend at home?
Yes, mixing a carrier oil like jojoba or coconut with a few drops of rosemary or peppermint essential oil creates an effective custom blend. Homemade recipes and results for 2025 offer tested formulas worth trying.
What if my scalp gets itchy from oiling?
Reduce your oiling frequency first, then try switching to a lighter oil or rinsing more thoroughly. Scalp buildup from over-oiling is a common and fixable cause of scalp irritation.
Recommended
- Build an effective oil hair routine for growth & health | MyHair
- Hair Oiling Routine 2025: Boost Growth and Reduce Hair Loss | MyHair
- How to Use Hair Oil for Natural Hair Growth and Strength | MyHair
- Hair Care Oils: Your Guide to Choosing the Right Oil | MyHair
- Expert Tips for Growing Hair Longer Naturally - Joel C Ma Hair Studio
- Love Your Hair: Products to Maintain Healthy Hair at Home