Blog
Learning Materials
Craft Your Own Homemade Hair Conditioner for Healthy Growth
Updated: September 16, 2025
Making your own hair conditioner sounds simple and earthy. Creating the perfect mix at home can actually rival professional formulas. The real shock is that with just a few kitchen staples like coconut oil and raw honey, you can whip up a treatment packed with more active nutrients than most store bought brands. It is not about fancy bottles or marketing claims. It is about science, freshness, and a formula built just for your hair, right from your own hands.
Table of Contents
- Step 1: Gather All Necessary Ingredients And Tools
- Step 2: Prepare Your Hair Conditioner Base
- Step 3: Combine Key Ingredients For Customized Benefits
- Step 4: Blend The Mixture To Achieve Desired Consistency
- Step 5: Conduct A Patch Test For Safety And Efficacy
- Step 6: Store Your Homemade Hair Conditioner Correctly
Quick Summary
| Key Point | Explanation |
|---|---|
| 1. Gather quality ingredients first | High-quality carrier oils like coconut, jojoba, and argan are essential for effective conditioning and moisture retention. |
| 2. Create a smooth conditioner base | Begin with ingredients at room temperature to ensure even mixing, which contributes to a uniform texture. |
| 3. Customize for specific hair needs | Integrate specialized ingredients like avocado or keratin to address issues like dryness or breakage effectively. |
| 4. Conduct a patch test before full use | Test a small skin area first to check for any allergic reactions or sensitivities before applying it to your scalp. |
| 5. Store properly to maintain effectiveness | Use non-reactive containers and refrigerate if necessary, ensuring the mixture stays potent and safe for use. |
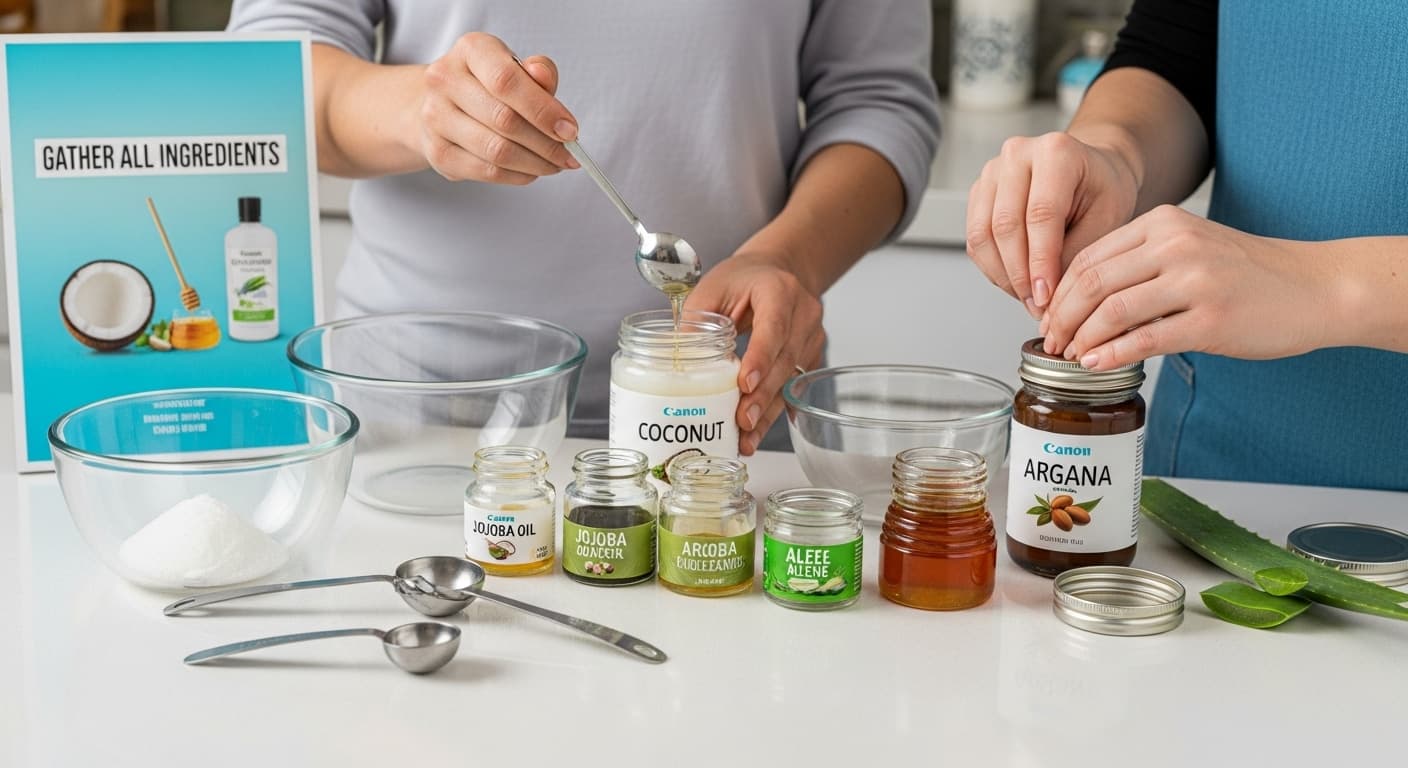
Step 1: Gather All Necessary Ingredients and Tools
Creating a homemade hair conditioner begins with assembling the right ingredients and tools. This foundational step ensures you have everything prepared to craft a nourishing hair treatment that supports healthy hair growth and provides natural moisture.
Start by collecting your base ingredients. You will need high quality carrier oils that form the foundation of your conditioner. Coconut oil, jojoba oil, and argan oil are excellent choices for their deep moisturizing properties. These natural oils penetrate hair shafts, delivering essential nutrients directly to your follicles.
Next, gather additional components that enhance conditioning effectiveness. Raw honey acts as a natural humectant, drawing moisture into hair strands. Aloe vera gel provides soothing properties and helps balance scalp health. For protein reinforcement, consider egg yolk or yogurt, which strengthen hair structure and promote resilience.
Your tool kit is equally important for successful preparation. According to research from the National Center for Biotechnology Information, precise mixing ensures optimal ingredient integration. Essential tools include:
- Glass or ceramic mixing bowl
- Whisk or electric hand mixer
- Measuring spoons
- Airtight storage container
- Clean applicator bottle or jar
Select tools made from non reactive materials to preserve the integrity of your natural ingredients. Glass and ceramic prevent chemical interactions that might compromise your homemade hair conditioner's effectiveness.
Temperature and storage conditions matter significantly. Work in a clean, cool environment and use room temperature ingredients for smoother blending. Store your finished conditioner in a cool, dark place to maintain its nutritional potency and prevent bacterial growth.
Verify your ingredient quality by checking for freshness and purchasing from reputable sources. Organic, cold pressed oils and fresh, unprocessed ingredients yield the most powerful homemade hair treatments. Your careful preparation sets the stage for a transformative hair care experience that nurtures growth and restores natural shine.
Step 2: Prepare Your Hair Conditioner Base
Now that you have gathered your ingredients, it is time to transform them into a powerful homemade hair conditioner. This critical step involves carefully combining your selected ingredients to create a nourishing base that promotes healthy hair growth and restores natural shine.
Begin by selecting a clean mixing bowl large enough to accommodate all your ingredients comfortably. Temperature matters significantly in ingredient integration, so ensure all components are at room temperature. Start with your liquid base ingredients like aloe vera gel or yogurt, which provide a smooth foundation for your mixture.
Slowly incorporate your carrier oils, such as coconut or jojoba oil, into the base. These oils are crucial for hair penetration and nutrition. Whisk the mixture gently but consistently to create a uniform consistency. If you are using egg yolk as a protein source, separate the yolk carefully and blend it smoothly to prevent clumping.
According to research on herbal hair conditioning techniques, natural ingredients like honey can significantly enhance moisture retention. Add raw honey incrementally, stirring continuously to achieve a balanced texture. The goal is a creamy, spreadable consistency that will coat hair strands effectively.
For those interested in exploring more natural hair care solutions, check out our comprehensive guide on homemade hair oil recipes for additional insights and variations.
Careful mixing is key. Use a hand whisk or electric mixer on low speed to blend ingredients thoroughly without introducing excessive air. Watch for smooth integration without separation. Your conditioner should have a consistent color and texture, free from lumps or oil pools.
Verify your base's quality through these quick checks:
- Smooth, cream like consistency
- No visible ingredient separation
- Pleasant, natural scent
- Even color throughout the mixture
If your mixture appears too thick, add a few drops of warm water. If too thin, incorporate a small amount of additional oil or yogurt. The perfect homemade hair conditioner requires patience and subtle adjustments.
Remember that crafting your conditioner is part science, part art. Each batch might vary slightly, and that is perfectly normal. The key is creating a nourishing treatment tailored to your unique hair needs.
Step 3: Combine Key Ingredients for Customized Benefits
With your base prepared, it is time to personalize your homemade hair conditioner by incorporating targeted ingredients that address specific hair concerns and promote robust growth. This step transforms your basic mixture into a powerful, customized hair treatment.
Consider your unique hair needs when selecting additional ingredients. For individuals experiencing dry or damaged hair, avocado or shea butter can provide intense moisture and repair. Those battling hair breakage might add keratin protein or egg yolk to strengthen hair strands from the root.
According to research investigating protective hair conditioning techniques, certain natural compounds offer remarkable protective benefits. Strategically incorporating ingredients like ferulic acid or mangiferin can shield hair from environmental damage while supporting overall hair health.
For those seeking comprehensive hair care guidance, our expert tips for stronger growth provide additional insights into holistic hair maintenance.
Blend your selected specialized ingredients thoroughly into the base mixture. Use smooth, consistent stirring motions to ensure even distribution. If adding essential oils for fragrance or additional benefits, introduce them drop by drop. Peppermint oil stimulates scalp circulation, while lavender offers soothing properties.
Temperature and timing are crucial during this stage. Work in a cool environment and mix ingredients at room temperature to preserve their nutritional integrity. Avoid overheating, which can degrade delicate compounds and reduce the conditioner's effectiveness.
Verify your customized conditioner's quality through these key indicators:
- Smooth, uniform consistency
- Balanced fragrance from essential oils
- No separation of ingredients
- Pleasant, natural color
Remember that each batch of homemade hair conditioner is unique. Small variations are normal and reflect the personalized nature of your treatment. The goal is creating a nourishing product that responds directly to your hair's specific requirements.
Experimentation is key. Start with small quantities of specialized ingredients and observe how your hair responds. Some trial and adjustment will help you develop the perfect formula that promotes healthy hair growth and restores natural vitality.
Step 4: Blend the Mixture to Achieve Desired Consistency
Blending your homemade hair conditioner is a delicate process that transforms individual ingredients into a unified, powerful treatment. This critical step determines the texture, effectiveness, and overall performance of your personalized hair care solution.
Begin by selecting the right mixing technique. A hand whisk works well for smaller batches, while an electric mixer provides more consistent results for larger volumes. Start mixing at a low speed to prevent ingredient splatter and gradually increase to medium speed. The goal is creating a smooth, uniform mixture without introducing excessive air bubbles.
According to research on blending techniques, the molecular interaction between ingredients significantly impacts the final product's quality. Pay close attention to how different components integrate. Oils and water based ingredients might require extra attention to prevent separation.
If you are looking to expand your natural hair care knowledge, explore our comprehensive guide on hair masks for additional insights into creating effective treatments.
Temperature plays a crucial role in achieving the perfect consistency. Work in a room temperature environment to ensure ingredients blend smoothly. If your mixture appears too thick, incorporate warm water incrementally. For a thicker texture, add small amounts of carrier oil or natural thickening agents like aloe vera gel.
Monitor your blending technique carefully. Overmixing can introduce unwanted air pockets or break down delicate ingredients. Aim for a creamy, spreadable consistency that coats hair evenly. The ideal homemade conditioner should feel smooth and luxurious between your fingers.
Verify your mixture's quality through these key indicators:
- Uniform color throughout
- No visible oil separation
- Smooth, creamy texture
- Easy spreadability
- Consistent thickness
Experimentation is key to perfecting your blend. Each batch might require slight adjustments based on ingredient quality and environmental conditions. Trust your intuition and be willing to make small modifications.
Remember that creating the perfect homemade hair conditioner is part science, part art. The process requires patience, attention to detail, and a willingness to learn from each attempt. Your personalized conditioner will not only nourish your hair but also reflect your unique approach to natural hair care.
Step 5: Conduct a Patch Test for Safety and Efficacy
Conducting a patch test is a critical safety step in your homemade hair conditioner journey. This process helps identify potential allergic reactions or skin sensitivities before applying the product to your entire scalp, protecting you from unexpected adverse effects.
Begin by selecting a small, discreet area of skin typically hidden from view. The inner forearm or behind the ear are excellent locations for patch testing. Clean the selected area thoroughly with mild soap and water, then pat dry to ensure a clean testing surface.
According to research on personal care product safety, systematic patch testing is essential for preventing potential skin reactions.
 Apply a small amount of your homemade conditioner to the chosen skin area, using a clean cotton swab or fingertip.
For those interested in comprehensive hair care strategies, explore our expert tips for stronger growth to complement your patch testing process.
Leave the product on the skin for 24 to 48 hours, covering the area with a loose bandage to prevent accidental removal. During this period, avoid washing the area or exposing it to water. Monitor the test site carefully for any signs of irritation, which might include redness, itching, swelling, or burning sensations.
If you experience any negative reactions during the patch test, immediately remove the product by gently washing the area with cool water. Discontinue use of the homemade conditioner and consult a healthcare professional if symptoms persist or worsen.
Verify the safety of your homemade conditioner by checking for these indicators:
- No redness or inflammation at the test site
- Absence of itching or burning sensations
- No visible skin bumps or rash
- Skin remains smooth and unchanged
Patch testing is not a one time event. Even if your first test goes smoothly, sensitivities can develop over time. Repeat the patch test periodically, especially if you modify your conditioner's ingredient list or notice changes in your skin's response.
Remember that everyone's skin is unique. What works perfectly for one person might cause a reaction in another. Patience and careful observation are your best tools in creating a safe, effective homemade hair conditioner that nurtures both your hair and skin.
Step 6: Store Your Homemade Hair Conditioner Correctly
Proper storage of your homemade hair conditioner is crucial for maintaining its effectiveness, preventing bacterial growth, and preserving the nutritional integrity of your carefully crafted mixture.
 This final step ensures that your natural hair treatment remains potent and safe for multiple uses.
Select a storage container that is clean, dry, and made of non reactive materials like glass or high quality ceramic. Avoid plastic containers, which can leach chemicals and potentially compromise your conditioner's natural ingredients. Sterilize your chosen container by washing it thoroughly with hot water and allowing it to air dry completely before transferring your mixture.
According to research from the University of California, storing personal care products correctly is essential for maintaining their quality and preventing contamination. Choose a storage location that is cool, dark, and away from direct sunlight or heat sources.
For those seeking additional insights into comprehensive hair care, explore our expert tips for stronger growth to complement your storage strategy.
Refrigeration can extend the shelf life of your homemade conditioner, especially if it contains fresh ingredients like eggs or yogurt. However, always allow the product to reach room temperature before application to prevent shock to your hair follicles. Mark the container with the preparation date and aim to use the conditioner within two to three weeks for optimal freshness.
Be vigilant about potential signs of spoilage. If you notice any changes in color, smell, or texture, discard the mixture immediately. Natural ingredients are more susceptible to bacterial growth compared to commercial products with preservatives.
Below is a checklist table summarizing how to verify the quality and safety of your homemade conditioner at different preparation stages.
| Stage | What to Check For | Pass Criteria |
|---|---|---|
| Conditioner Base Preparation | Consistency, separation, scent, color | Smooth, uniform, no lumps, pleasant |
| Customization with Specialized Ingredients | Uniformity, fragrance, ingredient separation | Balanced scent, no separation |
| Final Blending | Color, oil separation, texture, spreadability | Uniform color, creamy texture |
| Patch Testing | Redness, bumps, itching, burning | No negative skin reaction |
| Storage | Odor, texture, spoilage signs | No off-odors or texture changes |
Verify your storage method through these key indicators:
- Container is clean and sterilized
- Lid seals tightly
- Storage area is cool and dark
- Product remains consistent in texture
- No unusual odors develop
Consider preparing smaller batches more frequently rather than creating large quantities that might expire before use. This approach ensures you always have a fresh, potent homemade hair conditioner tailored to your specific hair needs.
Remember that crafting your own hair care products is an ongoing process of learning and refinement. Each batch represents an opportunity to understand your hair's unique requirements and develop a personalized care routine that promotes healthy, vibrant growth.
Take Your DIY Hair Care to the Next Level with Personalized AI Insights
Creating your own homemade hair conditioner is a powerful step in nurturing your hair with natural ingredients. But sometimes, even with careful ingredient selection and blending, it is hard to know exactly what your hair needs for true growth and resilience. You may find yourself questioning if your efforts are truly optimal or if there is a way to see real, measurable results tailored to your unique hair pattern.

Why guess when you can know? Let MyHair.ai analyze your hair health and pinpoint what matters most for growth. Our platform uses cutting-edge AI technology to give you a personalized assessment based on your hair's current condition and unique needs. Get clear recommendations that are right for you, all in an easy-to-use interface. Track your progress, receive custom growth projections, and confidently adjust your homemade hair care routine. Ready for science-backed results? Visit MyHair.ai now to begin your free assessment and unlock tailored solutions that make your healthy hair journey easier and more effective.
Frequently Asked Questions
What ingredients are essential for a homemade hair conditioner?
Key ingredients include carrier oils like coconut oil, jojoba oil, or argan oil, along with raw honey, aloe vera gel, and optional ingredients like egg yolk or yogurt for protein reinforcement.
How do I store my homemade hair conditioner to maintain its freshness?
Store your conditioner in a clean, sterile container made of glass or ceramic, away from direct sunlight and heat. Refrigerating it can extend its shelf life, especially if it contains fresh ingredients.
What is the importance of conducting a patch test before using homemade conditioner?
A patch test helps identify potential allergic reactions or sensitivities by applying a small amount of the conditioner to a discreet skin area and monitoring for any adverse effects over 24 to 48 hours.
Can I customize my homemade hair conditioner for specific hair concerns?
Yes, you can tailor your conditioner by adding specialized ingredients. For example, avocado or shea butter for dry hair, and keratin protein or egg yolk for strengthening hair against breakage.